Showing posts with label Spellbinders. Show all posts

12/13/2021

Christmas Card 2021


      Today, I would like to share my Christmas card with you. I know I've not shared here in a long while. I've been busy working on my writing projects. More coming on that soon. I'm having so much fun writing, but I had to take a day off so that I could play with my paper, ink, stamps and dies. A girl can only go so long without making a card. 

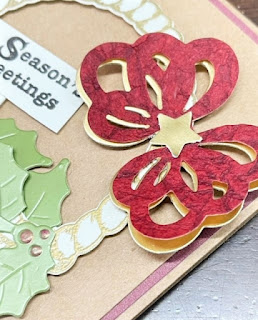
     The basket is heat-embossed in gold (Divinity Designs). The ivy and bow are die-cuts (Spellbinders Paper Arts). The sentiment also heat-embossed in black (Fiskars).


     Look at the detail in the bow. Isn't it gorgeous!?! The red layer is a kind of leather-like and is full of texture (the Paper Studio). The bottom layer is bright, metallic gold. They look so pretty together. 

********

Designer Tip:  Don't feel like you must create cards or other paper projects using only stamps and dies from one company. So many stamps and dies work beautifully together. There is one exception to keep in mind. If you are entering a challenge on a website, sometimes you must use only that company's products.

********

     Thanks so much for stopping in. Hope you have a wonderful Christmas surrounded by all those you love most. 

    Pamela 


1/19/2021

Come See the Magic Card

A Magical Card
Could it be magic? Pull the tab and find out.
     Pull the tab and see the magic happen. 
Keep pulling.

Pull it further until the bees are completely colored. Push the tab back down and the color vanishes.
I stamped the bees with stamps from Reverse Confetti. The sentiment tag stamped from Stampendous and I die-cut the frame with a Spellbinders Paper Arts die. THe beautiful cardstock is from the Paper Studio.
Thanks for stopping by today. 
     Enjoy your day and stay safe out there. May the Lord be glorified by the work of my hands,

 Pamela

7/11/2019

Flip-n-Fold Birthday Card

 
     Today I have a flip-n-fold card for you. My first. I've been seeing these cards around the web and wanted to give them a try.
     I first stamped the daffodils (Gina K Designs) and colored them with pencils (PrismaColor). Then, I die cut the labels and card base (Divinity Designs). Using the same yellow cardstock, I die cut two lattice panels (Divinity Designs). I trimmed their facing edges along the label edges. That was much easier to do than it might look.
     I added a fancy filigree die cut that is actually the top part of a tree (Spellbinders) that I think looks fancy and perfect for this card. I added a sentiment tag to finish it off.
     I had tons of fun creating this card and will make more!
 
Designer Tip: I save all the die cuts I make that don't turn out perfect. Then, I use them on cards like this one where I used the top of a tree die.
 
Designer Tip: When I die cut intricate shapes such as the tree on this card, I lay a piece of wax paper between the die and the cardstock. The die cuts pop right out with no bending or tearing.
 
     Enjoy your day and thank so much for stopping in!
 
                                                                    Pam


1/14/2019

Card & Matching Envelope Challenge - Simon Says Stamp

       Thanks for stopping in! Today, I have a card for the Card and Matching Envelope Challenge over at Simon Says Stamp.
 
     I created this card by first drawing a butterfly pattern that would fit inside a 4.25" x 5.5" envelope. I added score lines every 1/4" to the front of the card and the envelope back flap. I LOVE my scoring board and rarely make a card without it even if the only thing I do is score the fold line. I think it makes my cards more professional looking.
     Next, I die cut two fancy flourishes and adhered them to the butterfly. I heat-embossed the sentiment tag and used foam tape to adhere it. A few purple gems completed my card.
    
     A new challenge goes up every Wednesday. Here's a link to the Simon Says Stamp blog where you can see the rules and other challenges. https://www.simonsaysstampblog.com/wednesdaychallenge/
 
     Wishing you a fun day and inky fingers,
 
     Pamela
 
Materials Used:
cardstock- purple (Recollections, Cool Waters 221136)
                     blue (Momenta, Watercolor Splash 26643)
stamp-       Sending Love (Gina K Designs)
die-             Flourishes (Spellbinders S2-247)
ink-            violet (ColorBox CB15017)
powder-    clear (JoAnn Essentials)
scoring board
bone folder
gemstones


1/02/2019

Something New Challenge Simon Says Stamps


     I can say with great certainty that a person will not be struck down if they cut off an angel's wings and then turn her upside down.
     One of my favorite things to do in card making is to change up a die cut, stamp or other embellishment and turn it into something NEW.   


     That's how I made the blooms and bud for my card. First, I die cut the angel. Then, I made the cuts as you see here. I glued little hearts where the flower meets the stem and used foam tape to adhere the flowers to the card.
     I free cut the stems and added some fancy foliage die cuts. I die cut and embossed the cupcake and added a few sprinkles.
     I was so pleased with this card that I made two more while I had all my supplies out.

                               ********************
     I'm submitting this card to the Something New Wednesday Challenge over at the Simon Says Stamps Blog. There's still plenty of time for you to get your own card in. Come play with us! You can find the rules here: https://www.simonsaysstampblog.com/

                               ********************
     With family visiting, a trip to celebrate our 40th wedding anniversary, a few writing assignments, the holidays . . . the list has no end.
     Anyway, I've had quite a long break from my craft room and card making. I began to have withdrawals from lack of ink on my fingers. I should be able to get my usual dose of creativity back in my life now.
     Thanks so much for stopping in today.
     Happy crafting,
    Pamela

                                *********************
Materials Used:
cardstock - white, Jelly Bean Green, Lemon Drop, Wild Wisteria, Dusty Rose (Gina K Designs)
dies - Holiday Angel (Spellbinders S2-185)
           Fancy Foliage (Divinity Designs CSBD33)
           cupcake (Divinity Designs)
           hearts (Sizzix)
stamp - sentiment (Gina K Designs Stippled Flowers)
ink - black dye

9/30/2018

Anything Goes Challenge - Simon Says Stamps


Today, I have a card for the Anything Goes Challenge at Simon Says Stamps Wednesday Challenge.

Using metallic gold cardstock, I die cut and embossed leaves and a bow with dies from Spellbinders. I also used the gold stock to create a mat the front panel on my card.

DESIGNER TIP
To create more depth and dimension for your cards, try adding a mat behind the front panel.


There are still a few days left if you want to join in the fun with a card of your own. Here's a link to the rules.
https://www.simonsaysstampblog.com/wednesdaychallenge/

Thanks so much for stopping in. I'll look forward to seeing your cards.


9/23/2018

Bling It On Challenge

     Thanks for stopping in. Today I have a card for the Bling It On Wednesday Challenge over at Simon Says Stamps. I blinged it up with  gold-foil prints and glitter paper. There are still a few days left before the challenge ends. Pull out your blingiest supplies and enter your own card.

     Materials Used:
     foil cardstock- DCWV Beach House Stack
     glitter cardstock- the Paper Studio
     bow die- Spellbinders
     sentiment die- Spellbinders
    
     Here's a link to all the rules:
https://www.simonsaysstampblog.com/wednesdaychallenge/
  

5/05/2018

DCWV Stack-a-holic Challenge, May 2018

 
     Are these flowers not gorgeous!?! They are from the Botanical Beauty stack from DCWV, Inc. So many pretty sheets in this stack. Some have gold foil embellishing like the gold bees on my card. I made this card for the Stack-a-holic Challenge for May at DCWV.
     First, I trimmed my card front. Yes, it was hard to cut through these beautiful flowers, but you can do it! Next, I stamped and die cut my sentiment tags and adhered them with foam tape. To finish up, I added a few epoxy dots.
 
         Lately, I have been making 4.25 x 5.5 cards, but I wanted more of the flowers to show on this card, so I made this one 5 x 7.
     We had the sketch below to work with this month. There is still a little time to join in the fun if you have an idea for your own card. Details are on DCWV's Facebook page here: https://www.facebook.com/DCWVInc/.  
 
    Thanks so much for stopping in. Hope you are having a great day, Pamela
 
Materials Used:
 
cardstock- Botanical Beauty (DCWV)
stamp- A Happy Hello (Gina K Designs)
dies- frames (Spellbinders Card Kit)
ink- chalk Wisteria (ColorBox)


4/17/2018

DCWV Stack-a-holic Challenge, April 2018

     Today, I have a layout for April's Stack-a-holic Challenge at DCWV. This is my favorite picture of Mom and I. It was taken at the Amarillo airport. The horse in the background is one of the famous painted horses you can find around Amarillo. The journaling reads:

     Mom always said, "We have two choices when difficult things come our way. We can choose to be miserable, or we can choose to be happy. I choose happy!"
     Mom now sits at the Master's feet. I miss her.

     I used DCWV's Botanical Beauty stack to create my layout. The stack is all double-sided cardstock with gold foil on many of the sheets.

     To create my title and journaling tags, I printed them from my computer onto vellum.
    
DESIGNER TIP:
     When printing on vellum, you must be careful not to let the ink smear before it dries. Mine dried in about ten seconds. I planned to only use vellum for the title, but I thought I needed a bit more color to this layout so I ran the vellum through my Xyron Sticker Maker and adhered it to a piece of the cardstock.

     The deadline is now passed for entering a project this month, but you can still vote. I would appreciate it if you would vote for my layout, or any of the other entries you might like better. You can find the details on the DCWV, Inc. page on Facebook.

     Thanks so much for stopping in. Check back with DCWV at the first of the month for May's Stack-a-holic Challenge.

Materials used:

cardstock- Botanical Beauty (DCWV)
                  solid gold (Spellbinders)
dies- Fancy Foliage (ODBD)
        filigree (Spellbinders)
    

4/07/2018

Happy Birthday, Simon Says Stamps

     Today, I have a card for the "Happy Birthday Challenge" over at Simon Says Stamps. They are celebrating their 9th Anniversary this week. So excited for them!

     I don't usually use ready-made stickers, but I won this flower sticker in a kit from Spellbinders. It's so pretty that I had to use it for this card.

     You have plenty of time to join in the fun before a new challenge goes up next Wednesday. Here's a link to the rules.

http://www.simonsaysstampblog.com/wednesdaychallenge/

  Thanks so much for stopping by my blog today. I appreciate the time you spend here with me.      

Materials Used:
     cardstock, sticker, pearls - Spellbinders
     cardstock, ink - Gina K Designs
     stamp, die - ODBD
     double-stick and foam tape

3/17/2018

DCWV Stack-a-holic- March 2018

UPDATE: Super excited and very honored to learn that this card was a winner in its challenge. Thanks so much DCWV!

 
     Thanks so much for stopping in! Always so nice to have you here. Today, I have  card for the Stack-a-holic Challenge at DCWV. I used the Beach House stack to create my masculine birthday card.
     The deadline for entry is coming up this weekend, so be quick if you want to join in the fun. You can find all the details on DCWV's Facebook page.

%%%%%%%%%%%%%%
 
     DESIGNER TIP: When using such an intricate die, try using wax paper between the die and the front of your cardstock. I find my dies, like the one I used here, come out much easier and with no tearing.
 
%%%%%%%%%%%%%

     Here's a copy of the sketch we had to work with this month.
    Materials used:
          Cardstock- Beach House stack (DCWV)
                                gold (Spellbinders)
          Dies-            Tropical Paradise (Spellbinders)
          Stamp-        Birthday (Our Daily Bread Designs)
          Gems-          Liquid Texture Gems (Faber-Castell)    

10/08/2017

You're Amazing - Surprise Box


      I made this surprise box for a very dear and special lady. I had so much fun designing and creating this card for her.
     Yes, it's a card! If you have not seen these surprise boxes before, I'll tell you that they fold flat for mailing. Well, they usually do. I got a little carried away with filling it up with flowers and pearls and other things. I plan to give this to her in person so it doesn't really matter. It does fold enough to get it in an envelope but certainly not flat enough to mail without ruining it.
___________________

     I heat embossed and die cut the flowers in three sizes. I adhered the layers with foam tape between each and finished them with a pearl center. I stamped the leaves with a watermark ink to keep them more subtle.
     I made two sizes of medallions by cutting 1" x 11.5" and .75" x 11.5" cardstock strips. I scored them every .25".
     Here's a different look that shows the layers better.


___________________
    I'm going to post this card on Simon Says Challenge Blog for WORLD CARD MAKING DAY. Want to play along? Here's a link to the challenge. http://www.simonsaysstampblog.com/blog/happy-world-card-making-day-from-simon-says-stamp/

    Thanks so much for stopping in today. May the Lord be glorified by the work of my hands, and may my friend know how much she is loved,
          Pamela
___________________

Materials List
   cardstock-  wild wisteria, grass green (Gina K Designs)
                        white, pink, purple, yellow (the Paper Studio)
   stamps-      flowers & leaves (Bold & Blooming, Gina K Designs)
                        sentiment (Mon Ami, Cas-ual Fridays)
   dies-            surprise box (Our Daily Bread Designs)
                        flourish (Fantastic Flourish One, Spellbinders)
                     flowers & leaves (Bold & Blooming, Gina K Designs)
   punches-   corner rounder (EK Success)
   inks-           violet, orchid, canary, black (ColorBox)
                      watermark (VersaMark)
   pearls, bird- Recollections
   adhesives-  glitter tape, double-stick tape, foam tape (3M)
                      blue gel school glue (Elmer's)
  

9/29/2017

STV17MON39 - Inspirational Photo Challenge


    Today, I'm participating - playing, actually - in the weekly challenge over at Stamp TV for the first time. The team provided the photo below to be our inspiration. My eyes went straight to the apples.
     To create my apples and pears, I first die cut the fruit out of white cardstock. Then, I started daubing several colors until I was happy. 
     I created my "accidental background" when I was coloring my fruit on a piece of scrap piece of cardstock. I thought it looked so pretty with the colors all mixed up, so I decided it would be the best background for my card.
     There's still some time if you want to create your own card. Here's a link to all the rules.
http://stamptv.ning.com/forum/topics/stv17mon39-inspiration-photo
                                  -----------------------
  
  <<< DESIGNER TIP OF THE DAY >>>
    
     Don't be afraid of colors. Most objects have several different, sometimes surprising colors. I used four colors on my apples and three on my pears. I tried several different color combos before I was happy.
     Jump in and give it a try! And remember, it's only paper.                               


    May the Lord be glorified by the work of my hands,
 Pamela

<<< Materials Used >>>
cardstock:  grass green (Gina K Designs)
                     white and black (the Paper Studio)
stamps:      Bold & Blooming (Gina K Designs)
dies:            apple and pear (Spellbinders Paper Arts)
inks:            Black Onyx, Grass Green (Gina K Designs)
                     Citrus Splash, Orchid, Cranberry,
                     Fresh Green, Canary (ColorBox)

9/20/2017

Ironing Board Pops

    Today, I have a layout to share with you. And, a little bit of my heart.
 
         That's my mom there in the picture taken back in 1968. I now have the ironing board in the picture. It has a warp on the surface. It makes a loud pop every time I press with more than the slightest pressure. Ah, but it makes me happy! It brings back such sweet memories from when I was a little girl playing at her feet while she ironed.
     I wrote about "our" ironing board in a story for Angels on Earth magazine. I worked and worked to get a clear enough picture so that you could read the story here, but I was not successful. If you would like to read the story, you can read it free online here.    https://www.guideposts.org/better-living/positive-living/emotional-and-mental-health/memories-are-a-pressing-matter
 
                                                   *************************
      Materials List
Patterned papers-  the Paper Studio - Entirely Textures
Cardstock - gold, Die Cuts With a View, Beach House
Dies-   Spellbinders
Gems-   Die Cuts With a View, Jeweled Sheet

3/13/2017

Thank You Card - Stack-a-holic Challenge, March 2017


     Today, I have a card for the Stack-a-holic Card Challenge at DCWV. I love how this card turned out. Working tone-on-tone is one of my faves although I did use cream and dark turquoise with my lighter turquoise. I used pre-folded, textured card blanks from a Winter Collection of DCWV Box of Cards. The collection is marked Winter, but I think most of the colors in the collection work equally well for spring.
     I mostly give thank-you cards. People just love it when you recognize even the smallest things they do for you.

                            ************************

     I started with a light turquoise card blank. I used another card to die cut my top panel, sentiment tag and swirly embellishment. I grabbed the butterflies from a $1 bin at a craft store. I used chalk ink to stamp my sentiment because I wanted a softer feel for this card. I know the person to whom I'm sending it will love these soft colors.

                            **************************

     There is still plenty of time to get a card in for this month's challenge. Visit DCWV's Facebook page for the details on how to play along. Here's a copy of this month's card sketch to get you started.
No automatic alt text available.
     Thanks so much for stopping in, Pamela


3/05/2017

Wedding Inspiration Challenge ODBDSLC283

     UPDATE: So excited and honored to learn that Our Daily Bread Designs chose my card as a Customer-Card-of-the-Day from all those submitted this past year as they celebrate their 9th Anniversary.

     Today, I have a card for the Wedding Inspiration Challenge on the Our Daily Bread Designs Blog. I love black and white cards for occasions such as a wedding or wedding shower.
     I used four die sets from Our Daily Bread Designs to create my wedding inspired card.

          Ornate Hearts CSBD53
          Asters and Leaves CSBD57
          Fancy Foliage CSBD33
          Double Stitched Rectangles CBD123

     I used clear gems accents to finish the front.
     I try to always finish off the inside of my cards by bringing some element from the front to the inside. Here's what I did with this card.

     Now, I normally tell you about all the time you have left to join in the fun, but I'm barely getting mine in on time because of computer problems. There will be a new challenge up soon. You can check out the rules and new inspiration here: http://ourdailybreaddesignsblog.blogspot.com/
    
     Thanks so much for stopping in today. I always love your visits.
     May the Lord be glorified by the work of my hands. Pamela


1/13/2017

Paper Dress Card - DCWV Stack-a-holic, Jan 2017


Update:  Excited to find my card among the winning cards! Thanks so much to DCWV!  

    Ever wonder what happens if you cut an angel in half?!?


     It feels so so good to be back to my card making! I spent a lot of time browsing Pinterest and other web sites while my broken leg was healing these past five months. I saw a lot of paper dresses and wanted to try making one. I think the sketch from DCWV's challenge this month is the perfect forum for me to create my own paper dress.
     I used DCWV's The Painted Petals Stack, pre-embossed A2 cards and the clear Adhesive Jeweled Sheet to create my card. I began by die cutting two angels. Then, I cut the dark top-half off. I used the chad from the lighter purple to create an inlaid skirt. I used a heart for the bodice and diamonds for the waistband. Then, in a nod to my grannie who always made sure I had a nice and noisy cancan when I was growing up, I used a yellow flower die to create a cancan of sorts for my dress.
     There is still plenty of time to join in on the fun this month. Here's a link to the rules and a copy of the sketch we had to work with.
    And, so far, nothing bad has happened from my cutting an angel in half, so grab your scissors or paper trimmer and cut away.
     Other products used:

     Spellbinders Holiday and So Sweet dies
     Stampabilities Wire Dress Form stamp
     Fiskars That's Amore medium punch
     Our Daily Bread Designs Asters & Leaves die

     Thanks so much for stopping in. May the Lord be glorified by the work of my hands,
Pamela 

6/30/2016

Pop It Up Challenge - ODBDSLC275


     Thanks so much for stopping in! Today I have a card for the Shining the Light Challenge at Our Daily Bread Designs.
     If you are not familiar with these explosion boxes, you must give them a try. They are so much fun to make! This 'box' actually folds flat for mailing and storage. It pops right open when you take it out of the envelope.
     I used these two die-sets from Our Daily Bread that make the box so much easier to make than it looks.
          Surprise Box - CBD164
          Happy Birthday - CSBD77
     You have until July 3rd at 8:00pm EST to get something in for the challenge. Here's a link to the rules: http://ourdailybreaddesignsblog.blogspot.com/2016/06/odbdslc275-pop-it-up-or-add-dimension.html 

4/07/2016

CardMaker & Ranger Industries Blog Hop


     Welcome to the CardMaker and Ranger Industries Blog Hop!

     This week we, the members of the CardMaker Blog Team, have been playing with the new Tim Holtz water-reactive Distress Crayons. To be quite honest, I was really nervous about today's blog hop. I am more of a stamper than a painter-with-pigment kind of card maker. But, I surprised myself! I had so much fun with these Distress Crayons!
     To get the hang of working with these new crayons, I experimented on some scraps of cardstock first. After just a few tries, I found what worked best for me - work in small areas and smudge with a wet finger. I am really pleased with how my card turned out.
     To begin, I created a 4.25"x5.5" card base with heavy-duty cream cardstock. I heat-embossed a clear background onto another panel of heavy-duty cream cardstock.
     Then, I began coloring. I applied some of the crayon to my cardstock in a small area and with a wet finger smeared it out and over my background. With a wet paper towel, I gently wiped across the embossed areas to allow the embossing to show. I kept coloring little by little with different colors until my panel was all covered. I adhered it to my card with foam tape.
     I stamped over one of my practice-panels and trimmed it to use as the first piece of a freestyle-collage embellishment. I adhered the collage to my card with foam tape.
     I had so much fun learning to use these Distress Crayons! The colors are so vibrant. But, they can also be very soft depending upon how much water you use with them. It's all up to you. With a wet paintbrush, they also make an ombre look very easy to achieve.
     Thanks so much for hopping along with us today! Give these Tim Holtz Distress Crayons a try. I know I will be using my set often!

     Be sure and stop by my fellow Blog Team member's blogs and see all the inspiration they have to share with you today.

     Your next stop is at Carisa's blog.

    Below is a full list of participating blogs just in case you started here or get lost along the way.

   Have a wonderful day, Pamela


     Materials used:
          Distress Crayons-   (Ranger, Tim Holtz pack TDBK47919
                                               seedless preserves TDB49630
                                               chipped sapphire TDB49609
                                               festive berries TDB49586)
                                             
          cardstock-                heavy-duty cream (the Paper Studio 667998)
                                              navy, pink, purple (the Paper Studio 449769)
 
          stamps-                     background (Hero Arts, Line Dots CG316)
                                              butterfly (Unity Stamp Co, Butterfly Endearment UK-777A)
                                              sentiment (Hero Arts, CL342)
                                              dots (Fiskars, All Year Cheer 03-013370)
 
          ink-                            black dye (Memories BLACK-020MEMB)
                                              watermark pigment (VersaMark VM-001)
 
         embossing powder- clear (JoAnn Craft Essentials)
 
          dies-                           circles (Spellbinders GLD-005)
                                              confetti (Our Daily Bread Designs, CSBD15)
 
          brad-                         black (Recollections 356862)
 
          gems-                        purple (Studio G WM0161)
 
          paperclip-                mini (Tim Holtz, ideaology TH92791)

          adhesive-                  foam tape (Scotch 3M)