Showing posts with label Christmas. Show all posts

12/13/2021

Christmas Card 2021


      Today, I would like to share my Christmas card with you. I know I've not shared here in a long while. I've been busy working on my writing projects. More coming on that soon. I'm having so much fun writing, but I had to take a day off so that I could play with my paper, ink, stamps and dies. A girl can only go so long without making a card. 

     The basket is heat-embossed in gold (Divinity Designs). The ivy and bow are die-cuts (Spellbinders Paper Arts). The sentiment also heat-embossed in black (Fiskars).


     Look at the detail in the bow. Isn't it gorgeous!?! The red layer is a kind of leather-like and is full of texture (the Paper Studio). The bottom layer is bright, metallic gold. They look so pretty together. 

********

Designer Tip:  Don't feel like you must create cards or other paper projects using only stamps and dies from one company. So many stamps and dies work beautifully together. There is one exception to keep in mind. If you are entering a challenge on a website, sometimes you must use only that company's products.

********

     Thanks so much for stopping in. Hope you have a wonderful Christmas surrounded by all those you love most. 

    Pamela 


10/13/2017

Sketch Challenge - DCWV Stack-a-holic Oct 2017

     Today, I have a card for the Stack-a-holic sketch challenge over at DCWV. I used the Beach Front Stack and the Foiled Stack from Die Cuts With a View (DCWV on Facebook - Guidelines for the challenge are on their Facebook page.)
------------------------------------------
          Designer Tip
 
              Don't be afraid to use non-traditional colors on your
              Christmas cards like I have here. I chose teal and
              beige with a touch of gold for mine.
--------------------------
     To create the circles for my tree, I dug around in my punch drawer looking for anything that would make a circle.
      Here are some of the things I came up with. Look at the great circles on the "cherry punch". I punched a cherry stem not worrying about the stems and leaf since I planned to trim them off.
     Below is a copy of the sketch we had to work with. There is still a bit of time left before the deadline so come join the fun. Look up DCWV on Facebook for the details.
    Thanks so much for stopping in.
    May the Lord be glorified by the work of my hands,
                Pamela


11/12/2016

     So nice of you to stop in today. Since all my art supplies are still in storage after our move and while my broken leg heals, I wanted to share this black and silver Christmas card from a prior year. That post was the most popular among all my blog followers.
     I hope this card inspires you to create one of your own. I would love to see what you create. You can share it in the comments of today's post.
     I'll be back in a couple of weeks with more brand new posts and cards.

* * * * * * * * * *

          I am so very honored to be among the Bright Shining Stars of 2014 chosen by Our Daily Bread Designs.


     ODBD chose my black and silver Christmas card to feature in their  awards post today.
Our Daily Bread Designs, Sparkling Snowflake, Snowflake
        I love ODBD and all they stand for. They make it so easy for me to share my faith and love of our Heavenly Father.  I am especially fond of their scripture stamps and dies.
     You can see the other Bright Shining Stars of 2014 here: http://ourdailybreaddesignsblog.blogspot.com/2014/12/introducing-graciela-and-our-bright-and.html
     May God be glorified in my work,

Pamela

9/29/2016

Holiday Cards

     I'm super excited! CardMaker published two of my cards in their special Happy Holidays issue. I can't wait for you to see them! You can download the issue or buy a copy here: http://www.cardmakermagazine.com/shopping.php?mode=current_sip
     I'm still down with a broken leg for another month. All my card making supplies are in storage while our house is being finished and I heal. Thank each of you who has offered prayers and good thoughts on my behalf.
     Happy holiday-card making!
 

12/30/2014

Bright Shining Star of 2014 Award from Our Daily Bread Designs

          I am so very honored to be among the Bright Shining Stars of 2014 chosen by Our Daily Bread Designs.

     ODBD chose my black and silver Christmas card to feature in their  awards post today.
Our Daily Bread Designs, Sparkling Snowflake, Snowflake
        I love ODBD and all they stand for. They make it so easy for me to share my faith and love of our Heavenly Father.  I am especially fond of their scripture stamps and dies.
     You can see the other Bright Shining Stars of 2014 here: http://ourdailybreaddesignsblog.blogspot.com/2014/12/introducing-graciela-and-our-bright-and.html
     May God be glorified in my work,

Pamela

12/22/2014

DCWV December Stack-a-holic Card Challenge

      Where does the time go!?! Already time for another monthly challenge at DCWV!
     I do thank you for stopping in. I know how busy we all get just a few days out from Christmas. I'm planning to send this Christmas thank-you card to Mom. She loves red, so I know this card will be a hit with her!
     I used the CANDY CANE LANE STACK from DCWV to make my card for this month's Stack-a-holic Challenge.
     Other products I used are:
          Fiskars:  All Year Cheer (sentiment)
          Our Daily Bread Designs: Sparkling Snowflakes stamps
          Our Daily Bread Designs: Snowflake dies
          McGill:  tag punch
          Ranger:  white pigment
          StampinUp:  white embossing powder
          Recollections:  white pearls
     There is still time to join in the fun. Here's a copy of the sketch DCWV gave us to work with as well as the link to get all the details.  http://dcwvinc.blogspot.com/2014/12/december-stack-holic-challenge.html
     Thanks again for popping in! Hope you have a wonderful Christmas,

Pamela


11/26/2014

Our Daily Bread Designs Guest-Designer Week 4

     Thanks so much for stopping in for my fourth week as a guest-designer for Our Daily Bread Designs.
      I could hardly wait to show my next card to you. I just love how the Christmas tree came out! I used the stem-with-leaves die from ODBD's Fancy Foliage die set. I'll get to the details in just a minute.
     To begin, I made a 7 x 5 white card base. Using some gorgeous ODBD patterned papers, I cut various sized panels and matted them with  a tan/taupe/beige paper.
     I die-cut the snowflakes from another sheet of patterned paper. I adhered them to the card as shown. I used foam tape on the snowflake nearest the tree and heat-embossed the sentiment.
     Now for the tree! I love finding new ways to use my dies and other supplies, and that is just what I did to make my tree.  I adhered a 1/8" x 3.25" strip down the front of the panel. I die-cut 10 stems. To get them to flow - or swoop - in the right direction, I die-cut 5 of the 10 stems with the right side of the paper facing me. I die-cut the other 5 stems with the wrong side of the paper facing me. Beginning at the bottom, I layered the stems as shown allowing the stems to overlap and fall at a steeper angle as I went up. I added clear gems as ornaments and a tree-topper-star.
 
Our Daily Bread Designs products used:
 
          paper: Christmas Paper Collection 2013
          stamps: Snowflake Sentiments #ECS06
          dies: Snowflakes
                   Fancy Foliage
 
     You may also see my card on Our Daily Bread Designs' blog here: http://ourdailybreaddesignsblog.blogspot.com/

     I have so enjoyed my time as Guest-Designer for Our Daily Bread Designs. Your comments and visits to my blog are always special to me. It has been an honor to share my paper art with you. I hope you have found inspiration and encouragement. Wishing you and your family a wonderful Thanksgiving and Christmas season,
   
     ETA:  I am linking my card to the Tree-mendous Tree Challenge in the Moxie Fab World. There's still a little time left if you want to play along with us. Find the details here: http://www.moxiefabworld.com/2014/11/challenge-tree-mendous-trees.html


     Pamela


11/19/2014

Our Daily Bread Designs Guest Designer - Week 3

     So happy to have you stop by my blog today on my third week as a guest designer for Our Daily Bread Designs. Today, I have an easel card that celebrates winter. 
     This card is 4.25" x 5.5" overall. I started with a white card-base folded to be an easel. I trimmed a patterned-paper panel from ODBD's Christmas Paper Collection 2013 to fit the front of the card. I just love the tone-on-tone snowflakes on this sheet, so much so that it was hard for me to actually cut it. I inked the edges in red and added pearls to the center of some of the snowflakes.
     Using a red patterned-paper from the same collection, I stamped and heat-embossed five snowflakes in white. I die-cut them, and as you can see on the bottom-left, I used two of them together to give depth to the card. I added lots of pearls to each snowflake because I love pearls!  
     I added a few red and white striped strips and tucked another of my snowflakes behind the sentiment tag which I stamped in red. I inked the edges and adhered the tag with foam tape.
     Now just for fun, here are some close ups of my snowflakes. I so love this collection of snowflake stamps.


     Thanks so much for popping in today. I always enjoy your visits and comments.
  ***
Our Daily Bread Designs products I used to make my wintery card:
 
paper - Christmas Paper Collection 2013
 
stamps - Sparkling Snowflakes #ECS08
              Snowflake Sentiments #ECS06
 
dies - snowflakes
 
For more info, you can see my card on the ODBD blog at: http://ourdailybreaddesignsblog.blogspot.com/


11/13/2014

Holiday Challenge ODBDSLC217

     UPDATE: Just found out that my black and silver Christmas card won the challenge! So excited! Thanks so much to Our Daily Bread Designs for picking my card!


     I made this card for Our Daily Bread Designs' Holiday Challenge. I've always enjoyed using non-traditional colors for my Christmas cards. For this one, I used black and silver to get a more elegant look. I think black and white would also look good. Or, what about black and green!?! I guess I will be spending more time in my studio today.
     The patterned paper (DVWV Silver Script) already had the silver script on it. I used ODBD's Sparkling Snowflakes stamps (ECS08) to stamp all the snowflakes in silver and added a "diamond" to the center of each. I used ODBD snowflake dies to die-cut the big snowflake which I adhered with foam tape.
     For the sentiment, I used ODBD's Snowflake Sentiment stamps (ECS06). I stamped "Christmas Blessings" with black ink onto silver, satin ribbon. The whole stamp reads Snowy Christmas Greetings. But, since I only have this size of silver ribbon, I used just part of the stamp. This two words that I did use fit perfectly on my ribbon. I've been experimenting with stamping onto things other than paper. I'm pleased with how the stamp looks on this ribbon.
     There is still time if you want to play along with us. You can find all the details on Our Daily Bread Designs blog at: http://www.ourdailybreaddesignsblog.blogspot.com/search/label/Shining%20the%20Light%20Challenge
     Hope you will try some non-traditional colors on your cards this year. Hope you have a wonderful day!    

11/06/2013

Handmade Elements Challenge

    Thanks for stopping by today. Always love your visits. I'm playing along this week in Core'dinations ColorCore Cardstock online crop and getting a head start on my Christmas cards.

     The challenge here was to make a card using handmade elements. I made my Christmas tree with two sizes of heart punches (Fiskars). I used two shades of olive and dark rosy red from Core'dinations Nostalgia collection.
     First, with the lighter olive, I embossed - well actually I debossed because I got the paper against the plate (Spellbinders) upside down. But, I liked it so I went with it. I sanded the cardstock and punched four large and one small heart, turned them so the pointy end was up, and glued them together to make a tree. I decorated with pearls and a star which began life as a flower. I adhered the tree with foam tape to the rosy red panel.
     I cut a same-size panel of darker olive and embossed it with a folder (Sizzix) and fussy-cut the center out. I added thicker foam tape to adhere the top panel.
     You still have time to play along. Check the Master Challenge list here: http://www.coredinations.com/index.php/2013/10/31/master-challenge-list/


11/03/2013

CAS Christmas Card - Snowstar

     I'm playing along this weekend in Core'dinations ColorCore Cardstock online crop and getting a head start on my Christmas cards.
      Those who know me would tell you that I almost always use non-traditional colors for my Christmas cards - like this purple, blue and white card. The object of this challenge is to create a clean-and-simple card with a sentiment and two or less embellishments. As you see, I only used one which I call a snowstar.
     To get the snowflake brad (the Paper Studio) to shine, I laid it on the back side of a 5 x 7" grape panel from Core'dinations' Nostalgia collection. I marked the arms of the snowflake and then scored from the back along those lines. I did a little sanding and my snowflake, I mean snowstar, shines!
     I heat-embossed the sentiment (Fiskars) with white pigment and white embossing powder. I lightly sanded the edges of the tag to make it stand out against the same color background. To finish, I adhered the panel to a white card base.
     Thanks so much for stopping in today. There is still lots of time left if you want to play along with us. See the Master Challenge List here: http://www.coredinations.com/index.php/2013/10/31/master-challenge-list/


12/12/2012

CAS-ual Fridays Knotty or Nice Challenge CFC81

     So nice to have you stopping by today. I always enjoy your comments and emails. Today, I have a card for the CAS-ual Fridays Knotty or Nice Challenge. We had to make a project that had a knot or knots on them.

     I decided to go with a winter/snowman, I mean snow- WO-man, theme so I could have another card to send out this Christmas season. I started with a white card base. I covered that with patterned paper. For my snowwoman, I punched three sizes of circles from DCWV's, the Home Spun stack. I love the texture of this cardstock and I thought it added a little depth to my card. As you can see, my 'knots' are in the ribbon arms and hair ribbon.
     To make the sentiment, I cut apart some of my stamps to get the words I wanted for this card. Yes, I know, it seems sacrilegious to cut stamps up, but it really was not all that bad once I made the first cut. LOL
     The buttons are sticker ornaments that I already had on hand. I put them on in an arc to give my snowwoman a more feminine shape.
     There's still a little time to join in the fun. Check out the details here: http://cas-ualfridays.blogspot.com/2012/12/cfc81.html  I will also be adding this card to Paper Crafts December Gallery Challenge.

12/02/2012

CAS-ual Fridays Gift-Tag Challenge CFC80

     Thanks so much for stopping by again. This week CAS-ual Fridays challenged us to make gift tags. I love this challenge because it makes me make nice tags for my Christmas gifts. Thanks CAS-ual!
      I love blue and white for Christmas projects! I cut my tag from cardstock and scored an 1/8th inch line on all sides of the tag. I stamped the sentiment and the snowflake around the hole at the top with white pigment. I stamped and fussy-cut three poinsettias. I adhered maroon gems at the centers and attached the blooms with foam tape. I slipped on matching maroon ribbon at the top. I almost always decorate my punched holes on tags. I think it adds such a nice touch.
     Wishing you all a merry Christmas!
     I just added this tag to Paper Crafts December Gallery Challenge too.

Keen on Neon Tribute to Grannie

     I created this card for the Keen on Neon Holiday Challenge in the Moxie Fab World. Cath really had me thinking on this one, but I had fun! Here's my neon green and orange Christmas card.
     I remember fondly Grannie's silver Christmas tree. I'm sure you all have memories of those shiny trees. Well, I loved her tree. She had a color wheel she would sit underneath the tree. When she turned it on, gorgeous color shafts played through the branches! So of course, I had to create a silver tree on my card. I used silver pigment with kaleidoscope powder to heat emboss the tree. Then, I hung neon green and orange ornaments on my tree. I also heat-embossed the sentiment using neon orange pigment and kaleidoscope powder for more spakle. I made the 'star' at the top with left over 'V's from an alphabet sticker sheet.
    Grannie would have loved my tree. I miss her very much.
     Do you have an idea using neon? There is still plenty of time to join in the fun. Check out the details here: http://www.moxiefabworld.com/2012/11/the-keen-on-neon-challenge.html


Keen on Neon Holiday Challenge

     There is a fun challenge going on in the Moxie Fab World over at Paper Crafts. Cath issued a challenge to make Holiday cards, gift tags, etc. using neon colors. I created these gift tags a little while back. They are neon orange and dark turquoise. Who says you can't use non-traditional colors for the season? In fact, that really appeals to the rebel in me. I have another contribution coming up shortly.
     I used Fiskars stamps and crimper to make these tags.
     There's still time to join in the fun if you have an idea to add to the collection. Check out the details here: http://www.moxiefabworld.com/2012/11/the-keen-on-neon-challenge.html

11/12/2012

CAS-ual Fridays So Torn Challenge CFC78

     Thanks so much for stopping in today! I hope your day is as sunny and bright as mine.
     CAS-ual Fridays challenged us this week to make a project with a torn element. Here's my take on the challenge.
     I've been making Christmas cards this week so I took the challenge in that direction. First I made a 4.25 x 5.5 card out of black cardstock. Then, I cut a piece of dark red cardstock 4 x 5.25 and dry embossed it with A2 Quatrefoil embossing folder from the Paper Studio. I tore the bottom edge and added black ribbon and sparkly buckle also from the Paper Studio Spare Parts. The sentiment is from Fiskars All Year Cheer Collection.
     I think Mom will get this card. She loves anything shiny and red!
     Thanks so much for stopping by. If you have an idea for a torn-edge project, you still have time to get it ready. You can find all the details here: http://cas-ualfridays.blogspot.com/2012/11/cfc78.html.

10/30/2012

Alphabet Stickers Challenge

Jingle Bells Rock!
 
I made this card for the Alphabet Stickers Challenge in the Moxie Fab World.
I started by making a 4.25" x 5.5" card out of dark red cardstock. Using Fiskars' medium Jingle All The Way punch, I punched 12 bells - 6 in white, 6 in gold. I glued the bells together leaving just a hint of the gold to peak out the side to give dimension to the bells. I used EK Success Sticko stickers in gold glitter to spell out 'JINGLE'. I adhered a white ribbon bow and streamer and set the bells along the streamer with foam tape for a bit more dimension. To finish off, I rounded the bottom corners.
If you have an inspiration using sticker letters and want to join in the fun, you can check out the details here:  http://www.moxiefabworld.com/2012/10/paper-crafting-tips-tricks-week.html
 

10/29/2012

ORANGE Blog Hop Winner!

     Congratulations to Suzi #5563 who said: Another great project, even if you are a rebel! The colors are a surprise, but a gorgeous combo!
     Thanks to everyone who hopped with the Fiskateers this past weekend. Your visits and comments mean a lot to me!

10/26/2012

Fiskateers Third Annual ORANGE Blog Hop

     Welcome to the Third Annual Fiskateers ORANGE Blog Hop! If you're hopping along, you should have come from Donna #6036 www.scissorsstampsandscrapbooks.blogspot.com/  (If you are joining us in the middle, go to www.fiskateers.com to start from the beginning.) Today we are celebrating Fiskars' signature color, ORANGE. Almost everyone is familiar with Fiskars' famous orange-handled scissors, but Fiskars makes so many other wonderful products for crafting, sewing, gardening, and more. Each stop along our Hop will feature different Fiskars' products with a big helping of ORANGE! There will also be a giveaway from Fiskars for a lucky few who visit all the hops. And, I have a prize to giveaway too! Make sure you read this post all the way to the bottom for info on how to enter.
    
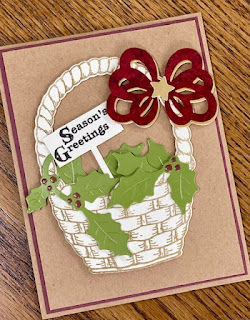
     Orange Christmas? Yes, of course, you can use orange - and turquoise - for Christmas! I'm a bit of a rebel when it comes to expected colors and using stamps and punches for their intended purpose. So, when I was asked to join this blog hop and the rules said I had to use orange I thought why can't I use orange for my Christmas tags. Here's my take on the challenge.
     The rectangle tag measures 2.5" x 5.5" and the circle tag is 4" across. I used four different Fiskars products to make these tags, but you should feel free to change them in any way and make them your own. Let's take a closer look at the round one.
1.  Cut a 4" circle in turquoise cardstock and run it through a crimper. 
2.  Cut a 3.5" circle in orange cardstock.
3.  Line up the two circles and punch holes for the ribbon.
4.  Stamp turquoise snowflakes of your choice on the orange circle making
      sure to stamp one over the hole you just punched. Allow some of the
      snowflakes to fall past the edge of the circle. Also stamp flourishes
      as desired.
5.  Adhere circles together with foam tape.
6.  Stamp sentiment, mat with crimped turquoise and adhere with foam tape.
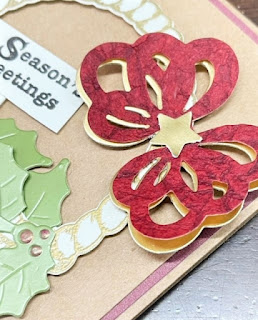
7.  Apply turquoise gems to snowflake centers and tie on ribbon.
Supply list is at the end of this post.
 
Now for my giveaway! I have a Fiskars border punch to give to a lucky blog-hopper. All you have to do to enter is sign up as a follower of my blog and leave a comment on this blog post. If you are already a follower, you may just leave a comment letting me know you were here and are a follower.
     Thanks so much for hopping with me today. It's always fun to have you stopping by.
    
 For more information about Fiskars and the Fiskateer program, you can go to http://www.fiskateers.com/join/. Now, hop along to the next stop! Shannon #6394 www.scraplady324.blogspot.com

Supply List
Fiskars Simple Stick rubber stamps from the Vintage Christmas collection
Fiskars Simple Stick rubber stamps from the Winter Wishes collection
Fiskars Simple Stick rubber stamps from the Seasons Greetings collection
Fiskars crimping tool
DCWV orange cardstock
Stampin Up turquoise cardstock
Martha Stewart circle cutter
EK Success corner rounder
ColorBox turquoise pigment ink
Studio G gems
Offray ribbon
foam tape

10/12/2012

DCWV October Card Sketch Challenge

UPDATE: November 2, 2011- I'm so excited! I just found out that this card made it to the TOP-10 list at DCWV! 
     I've been working on Christmas cards this week. I made this one for the October Card Sketch Challenge at DCWV. I used The Coral Couture Stack for this card. I love using unexpected colors for my Christmas cards. While the peach with shiny, gold dots is very Christmasy, I don't see a lot of Christmas cards with coral and mint green. I created the ornaments with my Fiskars That's Amore large heart punch. These ornaments also fold flat so that I can mail the card. I heat embossed the sentiment using stamps from Fiskars Season's Greetings collection.
    There's lots of time left for this challenge, so if you have a card idea you can find all the info here:
http://dcwvinc.blogspot.com/2012/10/october-stack-holic-challenge.html
 Here's a copy of the sketch Erin at DCWV gave us to work from this month.

     Thanks so  much for stopping in today. Your comments are so encouraging.